Reverse Engineering the Gameboy Boot Screen
Click here to go straight to the logo generator
A while ago I wrote about completely wiping the memory of an EMS 64m USB Gameboy cartridge. In doing that, I observed something interesting: if the rom was filled with all 1’s (0xFF), the Nintendo logo that scrolls down on boot would be all black, like if there was no cartridge inserted at all. If the rom as filled with all 0’x (0x00), the Nintendo logo was completely blank and only the ® symbol scrolled down.
In case you don’t know what I’m talking about, here’s an image that represents what happens when a Gameboy is booted (turned on). Or at least what’s supposed to happen.
If you ever owned a Gameboy, you’ll know that sometimes the logo is “scrambled” up. Sometimes Nintendo is still legible, sometimes it’s total garbage. And you’ll know that unless the logo is perfect, the Gameboy will just sit at that screen so you have to pull the cartridge out and blow in it or something and then try again.
So what’s going on here? Why is a Nintendo logo even shown? Surely you know that you’re playing a Nintendo Gameboy right? Well the explanation is somewhat fascinating.
Let’s go back to a few years prior to the Gameboy coming out and look at the Famicom/NES. In Japan at least (and other countries), the Famicom had problems with both piracy and unlicensed developers producing games. Here in the US the most famous was probably the Tengen games. Interestingly enough Tengen was really just Atari making games for the NES. Their cartridges were very distinct. Check one out:
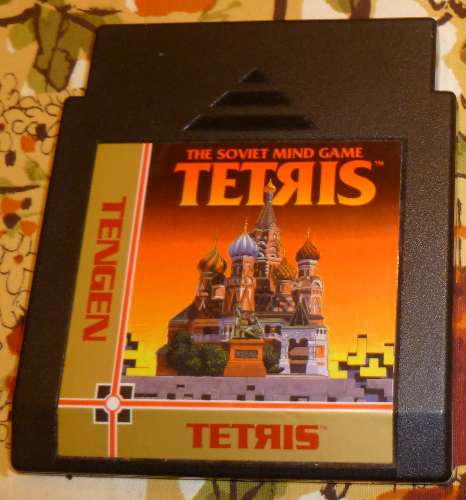
(As a side note, it’s interesting to point out that Tetris was originally released as an unlicensed game for the NES, and later Nintendo released their own unique version as an official first-party title. Tetris would go on to become a staple of any Nintendo system and was a launch title for the Gameboy.)
Nintendo didn’t want unlicensed developers for many reasons, but one of them was probably because they didn’t want to share the fate of Atari. The Atari consoles were plagued with incredibly low quality titles (E.T. comes to mind). Atari basically let anyone release a game for their systems. But because of that, consumers lost faith in Atari systems because there was no easy way to tell whether a game you were buying was high quality or made in a few days.
The problem is that there’s not really a good way of preventing people from releasing unlicensed games. Sure, you can not give them dev kits or other development tools. Sure you can try and ban unlicensed games from stores where licensed games were also sold. But ultimately, a console is a consumer’s and if they choose to play an unlicensed game on it there’s not much you can do about it.
Obviously this was a relatively big deal to Nintendo, so in the development of their next console, the Gameboy, they wanted to ensure no unlicensed games could be released. A scheme was developed!
While it’s not feasible to prevent an unlicensed developer from releasing a game for your system, it is legal to prevent people from reproducing your copyrighted works. So Nintendo put two and two together: they decided to force a game to contain the code for the Nintendo logo image in order for the Gameboy to boot it! Quite genius I’d say. (As a side note, SEGA did the same basic idea for the Genesis. It eventually went to court and SEGA lost.)
So I think that pretty well covers the “why” of the Nintendo logo boot screen. Now let’s look at “how” it works.
When you put a game in your Gameboy and turn it on, the data for the Nintendo logo is actually found in two places: once in the cartridge and once in the boot ROM of the Gameboy. When the Gameboy turns on, it reads the Nintendo logo data from the cartridge and displays it on the screen. Then, once that sequence is completed, it reads the logo again from the cartridge and compares it to the copy contained within the Gameboy boot ROM. If they’re not a perfect match, the Gameboy halts and won’t go past the logo screen. In other words, the logo data is read twice by the Gameboy: once for display, another for checking.
Interestingly, since the data is read twice, some unlicensed developers exploited that. They would have logo data for something other than Nintendo in the location the logo data was normally stored. So you could boot the Gameboy and see some other logo besides the Nintendo one. But, when the logo data was read again for validation, they would quickly change the logo data to the Nintendo logo. That way, the Nintendo logo was never technically reproduced on screen, yet the Gameboy would still boot. Even more genius if you ask me! Very few unlicensed games were released for the Gameboy (at least here in the states). Here’s the best list I could find of unlicensed games.
Now that we understand how the logo check works, let’s figure out why I saw the black bar logo with all 1’s in the ROM, and the blank logo with all 0’s.
I wasn’t too sure where to begin. The first problem is that most emulators don’t show the logo screen since they don’t implement the Gameboy boot ROM. I could flash my EMS card with each attempt, but that would take forever. It was also kind of an obscure thing to want, nobody cares about the logo screen right? Well fortunately for me, the excellent emulator BGB has many development tools baked in, including support for a boot ROM!
The next step was figuring out exactly how the logo data was laid out, as well as where it was in the ROM.
Every Gameboy ROM has a header section. It contains information about the game, such as Gameboy Color support, a title, and the Nintendo logo data. More information is available here if you’re interested.
I’m a genius though and didn’t think to do basic Googling before starting, so I just started by doing a basic manual binary search. I started with a ROM of 32k 1’s. Black logo. Then I erased half the ROM. Black logo. Then I erased half the ROM. Black logo. I did that until I had pinpointed exactly where the logo data was contained in the ROM. Then, I had a ROM with all 0’s but replaced the section for the logo with 1’s. Just what I expected, a black logo!
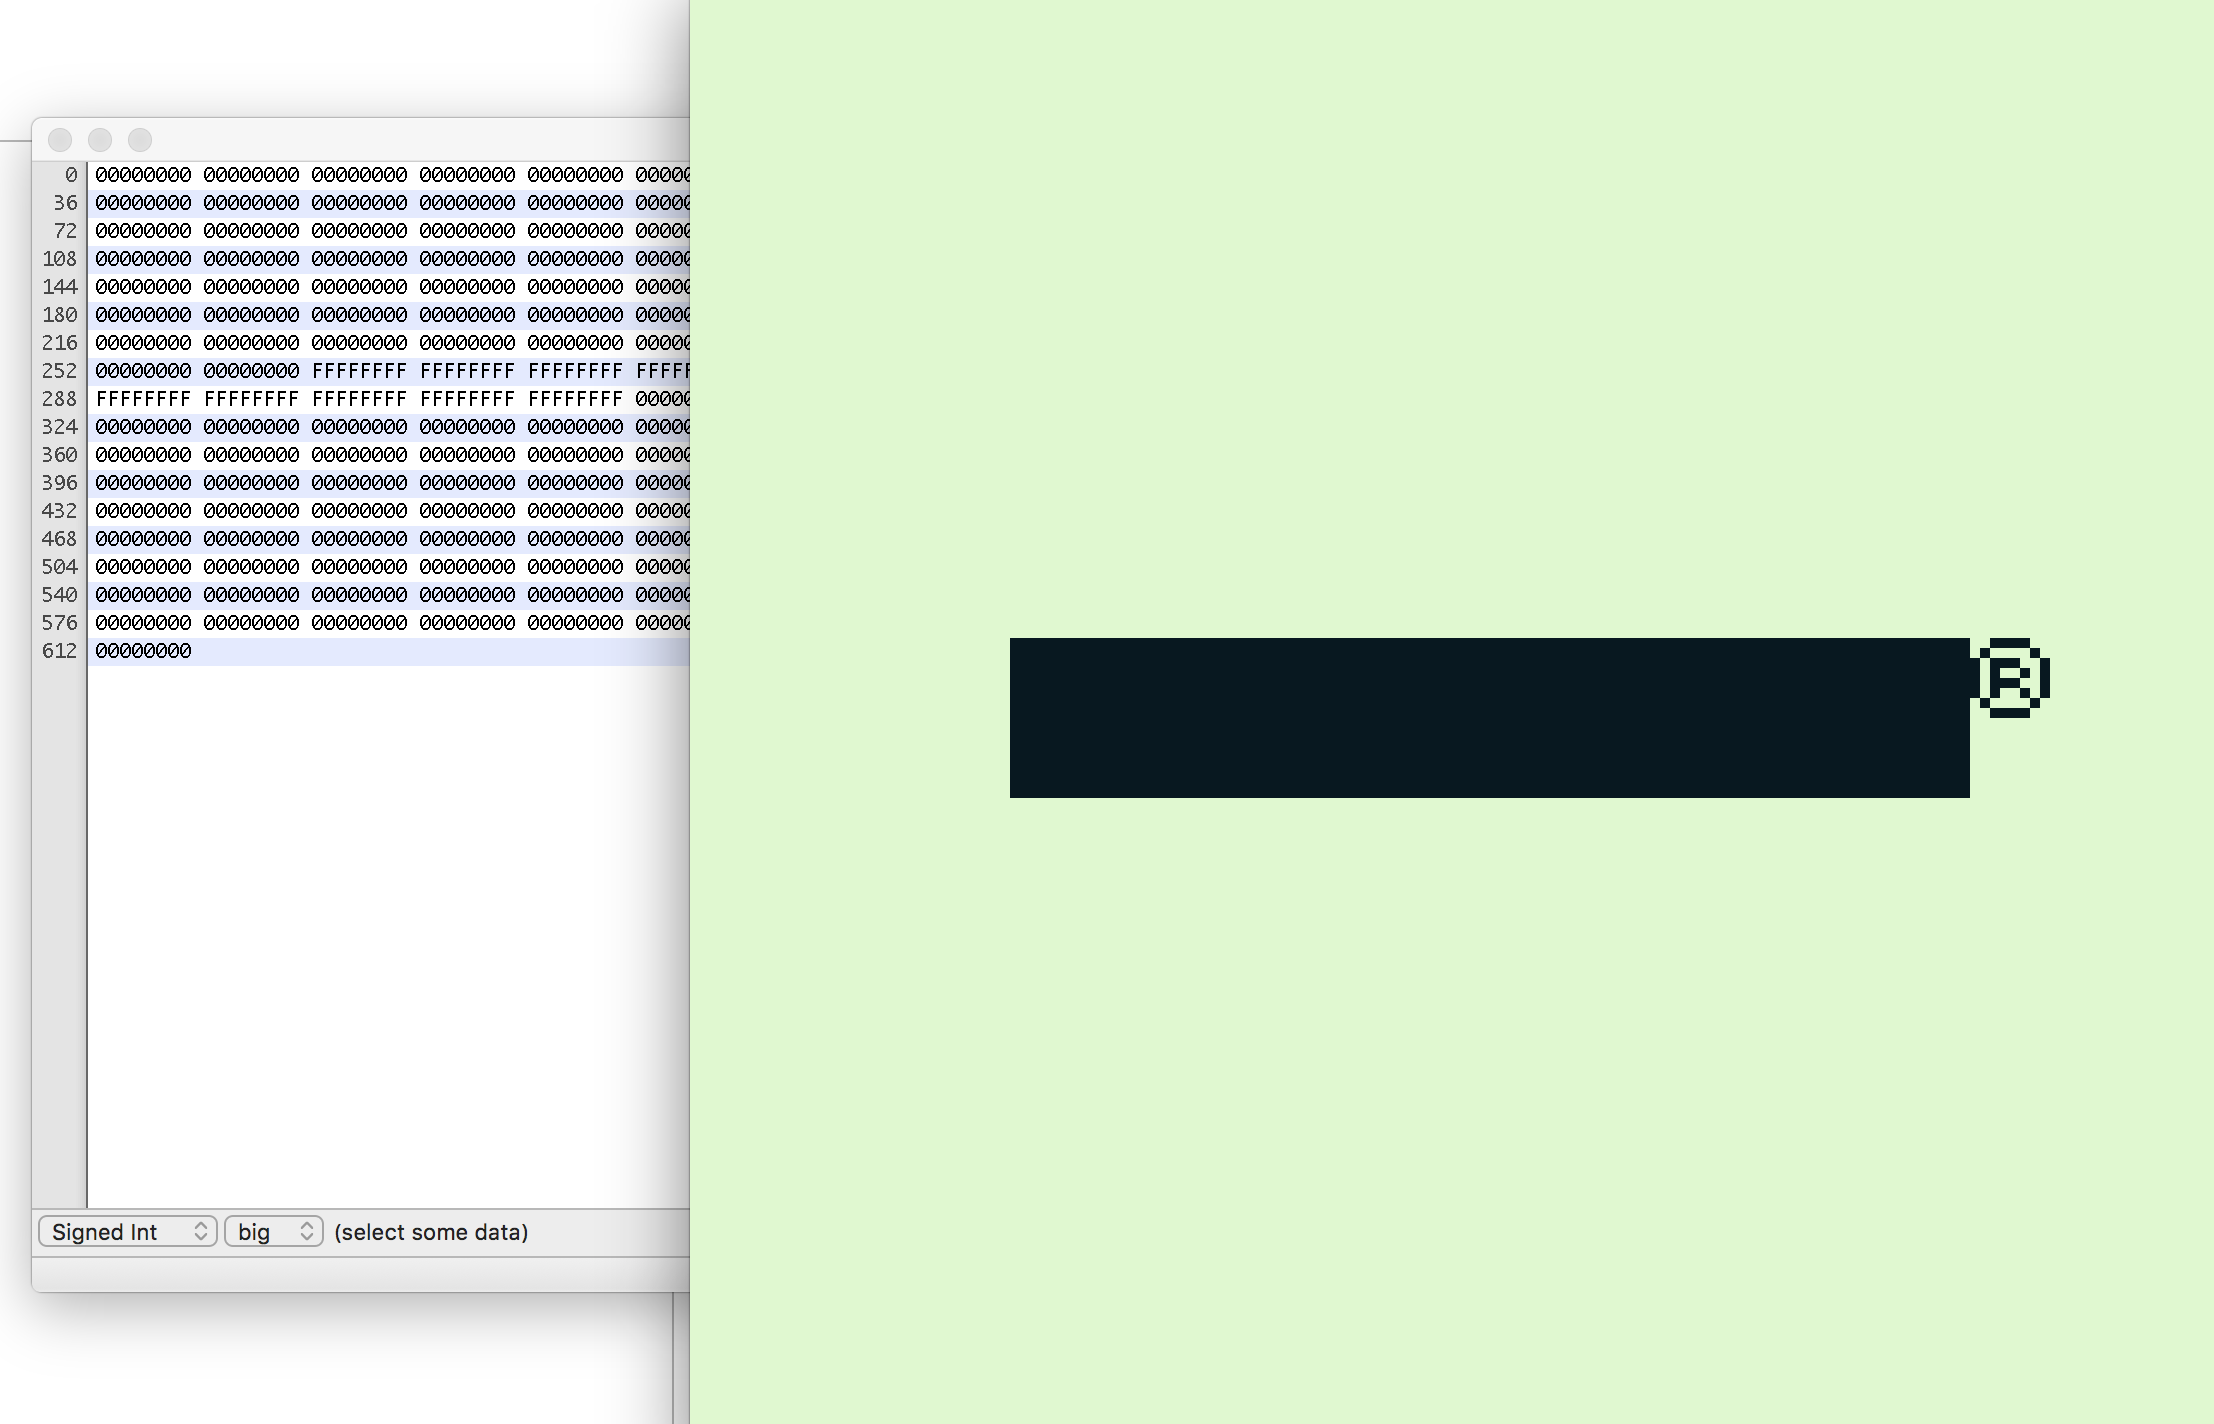
Now I knew where the data was stored, I needed to figure out how it was laid out. I changed the first 4 byte chunk of the logo from 0xFFFFFFFF to 0x01010101. Here’s what I saw:
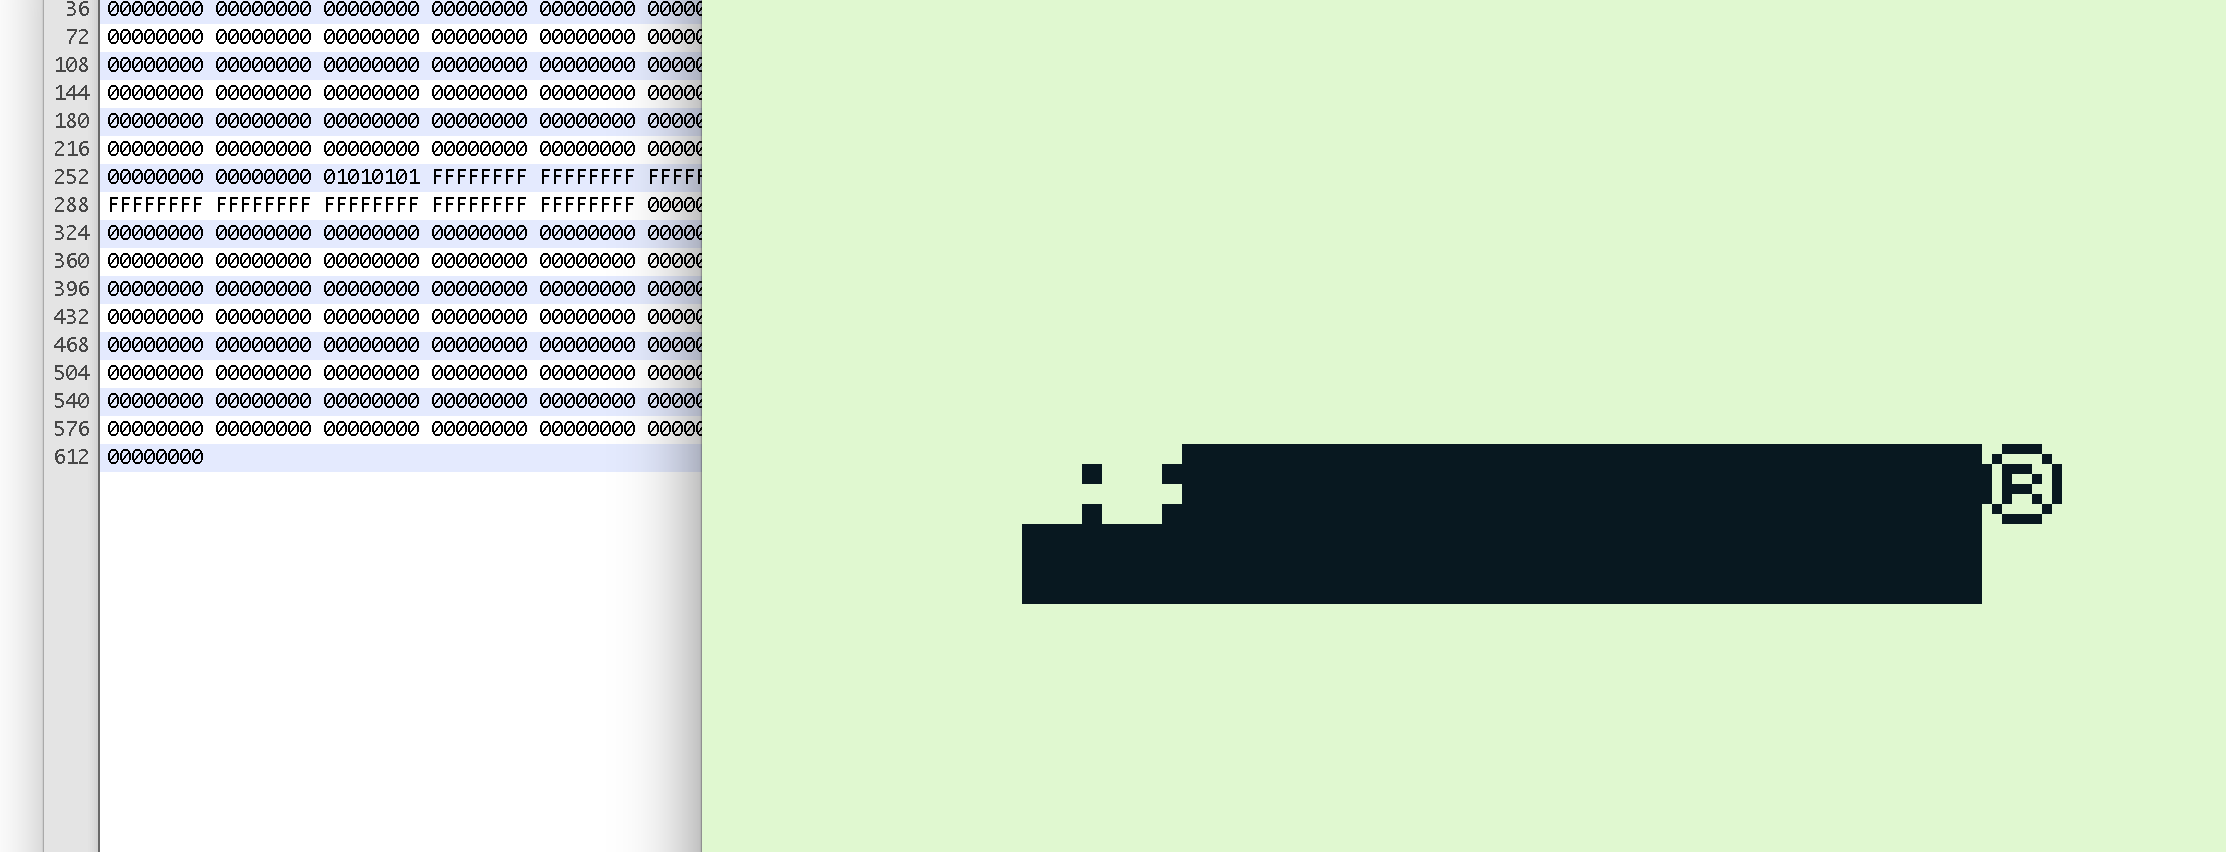
I observed that the data 0x01 was repeated 4 times, and that the top left chunk of the logo also had a sequence that repeated four times. After that, I changed that first 4 byte chunk to something like 0x02020202 and tried again. The image looked similar, but the dots were shifted to the left one pixel. Then I tried something like 0x03030303 and as expected, there were both of the previous dots.
I quickly discovered that the total logo was comprised of 48 bytes of data. As you can see though, the logo bytes don’t go straight across the top, rather, they form a larger square. Talking about it can only help so much, so here’s an image I made that represents how the pixel data is laid out:

Following this guide, it’s easy to make your own bitmap logo! Say for the top left byte you want only the top left pixel enabled. For that byte of data you would simply have 0x80. But say you wanted the top left pixel as well as the bottom right pixel? Simply bitwise OR 0x80 with 0x01 and you get 0x81. Similarly, if you OR 0x80, 0x40, 0x20, 0x10, 0x08, 0x04, 0x02, 0x01 you get 0xFF! It’s pretty simple right?
Now that I knew exactly how the logo data was laid out and could make my own boot logos, I wanted a way to be able to draw them easier. My brother had recently been complaining to me that web technologies were “too confusing” for him to figure out, so I thought a little web page that lets your draw a logo would be a great project for us to work on so he could get more comfortable with web programming. I’m no master myself, so it was good practice for me too!
I made an HTML table that was 48 cells wide and 8 cells high. In other words, a cell for each pixel in the logo. I also made the cells nice and square. Next was some crude javascript to toggle the cells fill color between black and white when clicked. After that, I made it so you could click and drag and essentially “paint” the table cells.
The next step was a bit of uncharted waters for me. I needed to convert the “painted” table to hex data. I wrote a little function that looked at all cells from top left to bottom right and if their background color was black, I OR’ed the hex data for that cell to get the bytes of data I needed.
Once that was more or less working, I wanted to export the hex data to a file that could be downloaded. This is where my brother really took over. I couldn’t for the life of me figure out how to write hex data to a plain text file in javascript! Googling wasn’t a ton of help because why would anyone ever need to do that? I was trying to convert each hex byte to ASCII and write that to a text file, but that wasn’t working due to encoding issues as well as the fact that there’s not an ASCII character for every hex value from 0x00 to 0xFF. I’m not sure what my brother did exactly to get it working, but he did and it worked well. He also went hog wild and decided to rewrite most of my code so it wasn’t held together with glue. He’s a much better programmer than me that’s for sure!
The next major hurdle was kind of unnecessary in the long run, but I wanted this logo ROM to be as close to a real working ROM as possible. I took a copy of Tetris (which is one of the smallest Gameboy games made with only 32k of data) and changed all the data to 0xFF except for the header. For the header, I set up a nice title (LOGO ROM) and I think I basically left the rest blank. Then, I cut the new ROM right before the logo data, and right after the logo data so I could sandwich the newly drawn logo data in between the other data and have a nice 32k ROM ready for download. It worked great, but this was unnecessary since the logo ROM wouldn’t get past the boot screen on a real Gameboy anyways. I could have just filled everything else with 0xFF but whatever I guess.
The last step was just cleaning up the code a bit and adding a few nice features like clear everything, invert everything, or load your own hex data so you don’t have to draw it. We also load the Nintendo logo by default so you can see exactly what the space you’re working with looks like.
All in all it was a fun little project to both do a bit of reverse engineering, research, and polishing my javascript skills by doing weird things that people don’t usually do in javascript. It was also fun to work with my brother on it. I’m sure the code isn’t anything spectacular, but it’s all open source and available on GitHub.
Check out the logo utility here!
Thanks for reading!
