Poop-O-Meter: Smart Diapers
Over the summer, I’ve been interning at Digi International doing python testing on their various radios such as the Xbee. It’s been pretty cool I guess, other than the fact I am forced to use Windows, my keyboard’s space bar emits a high pitched squeak whenever I hit it, and the git client they use is simply awful (it’s Atlassian’s SourceTree, but at least they use git!). It’s been really cool to work alongside some real-life, bonafide engineers who know what the heck they’re doing. Also my manager is so good at managing he could be admitted to the Justice League on those skills alone.
One of the things I was invited to participate in was an “intern challenge.” The idea is to do a fun project to show off what you’ve learned over the summer. I had way more project ideas than I’ll ever have time for, so I thought it would be great motivation to try and bang something out. Having a solid 4 months to work on it helped as well.
When I’m coming up with projects I’ve found that the best way to finish a project, (and because I’m super lazy) is to get it to a bare minimum level of functionality and make that my goal. Not only does the adrenaline rush that comes from that first hint of success come sooner, but it’s a great way to combat feature creep. Start with as little as possible, get it working, and if you have time add more.
Obviously I wanted something that could take advantage of the access I’d have to some Xbees. At ~30 bucks a pop each, and a minimum of two needed for a project, they would be otherwise out of my hobbyist budget. Fortunately Digi helped me out with some at a discount so I took full advantage of it!
So the real question was what should I build for my project? I knew I wanted my project to involve hardware, probably more so than software. My wife and I would be having our first baby within a month, so baby stuff was fresh on my mind. One possibility was a car seat occupancy detector. I’ve wanted to build that for a while now, but a lot of that would be writing mobile apps, which I’m not very good at and don’t enjoy that much. I’d still like to do it someday…
I’m not sure when or where it happened, but the thought crossed my mind to make a “smart diaper.” A baby diaper that would alert you when it needed to be changed. In a day when we have smart fridges, ovens and door locks, and wearable tech is all the rage, it would be the perfect fit! Then came the next question: surely someone has already done it, right?
A quick google search for “smart diapers” returns pretty much only some of these, which are cool but overkill for my purposes. I don’t need fecal matter tested, or urine tested, or anything like that. I just wanted to know when my baby’s diaper was dirty! Keep it simple, stupid! You can imagine how thrilled I was that my idea didn’t already exist!
As I started the initial planning stages, thinking about how I could actually build it and what hardware I could use, it became clear - it would be drop-dead simple! My system would consist of two “nodes”, a transmitter (diaper unit) and a receiver to light an LED and play a buzzer to alarm you that the diaper needed to be changed. I thought of baby monitors to design a system like that, they seem to work fairly well.
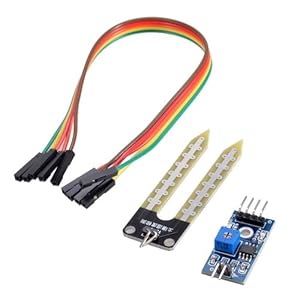
All dirty diapers have one thing in common: moisture. Poop or pee has significantly more water in it than a baby’s butt. That would be really nice to work with thanks to soil moisture sensors. At the time of writing, they can be purchased as cheap as $1.15 with free shipping from China. They’re nice because they work with 3.3v or 5v just fine, and that is important because the Xbees operate at 3.3v and are not 5v tolerant on the I/O lines. They can output either a digital or analog signal. If a digital signal is used, there is a potentiometer on board so you can adjust the threshold at which the digital signal will go high. They come stock with prong/fork kind of thing, but that really only serves as two strips of metal that could conduct electricity, so they could just as well be anything conductive. I used some regular old wire wrapping wire stripped of it’s insulation and sewed it through the diaper. Just two strips did the job just fine. I attached them where the metal fork would normally go, and as luck would have it, it worked just fine! I couldn’t believe it.
Once I had the detecting/sensing ironed out, I needed a simple and reliable way to transmit the status of the moisture detector. The Xbee product family is capable of supporting three main RF protocols: 802.15.4, ZigBee (which is really just 802.15.4 at heart), and DigiMesh Digi’s proprietary mesh network protocol. I’m a big fan of open standards so 802.15.4 was immediately attractive to me. I specifically enjoy the idea that I’m not forced into using any one product of protocol. For a project so simple, the features of ZigBee/DigiMesh just didn’t make sense. Once I made the 802.15.4 decision, I was quickly reassured that that was the correct choice. Xbee’s running 802.15.4 have an I/O line passing feature that ZigBee and DigiMesh do not have. Basically the way it works is a radio is configured to broadcast the status of an I/O (or multiple I/O) lines, and a remote radio receives the broadcast and then set’s it’s I/O lines to replicate what the broadcast had. The end result is what could be described as an invisible wire between two things: it acts like a wire, but it’s wireless. Really simple to setup and use also. That would be by far the easiest way to get I/O data out of an Xbee. Here is a document that can explain it a lot better than I can.
At that point I had figured out how to get the data and transmit it, so the next step was to actually do something with the data. I decided that rather than just an annoying piezo buzzer sound, I wanted a little tune to play. Piezo buzzers can play specific notes if you use pulse width modulation. I decided to use an 3.3v Arduino Pro Mini on the receiver end to light up the LED and play the melody. Essentially all it does is wait for an input to go low (low, because that how the Xbee transmitted the data. There’s a little more details there but I won’t go into them because I don’t really know and I didn’t spend a ton of time on it. Once I had it going high or low consistently I just went with it.). When the input is low, it waits a few seconds (a poor man’s debouncer), then sets the LED pin high, and plays the piezo melody once. The LED is driven directly by the arduino’s I/O, I don’t even think I used a resistor with the LED which is kind of a no-no but whatever, it works. The arduino code is all on Github for your forking pleasure.
Once I had all of that breadboarded and working, the only thing left to do was set up power and cram it all into a box. For the diaper unit I used a single AA battery in conjunction with one of SparkFun’s 3.3v step up converters. On the base unit I just used a spare breadboard power supply I had lying around. They’re capable of supplying 3.3 or 5 volts and have an input voltage of something like 5 - 24 volts or something crazy like that. A little ghetto rigged, but in the enclosure you’d never know.
And that’s really all there is to say. It works well for what it does. It’s super simple. A 10 year old could easily build one. But hey, Digi liked it and I won second place in the intern challenge! Watch the embedded YouTube video I made for the presentation for a demonstration and my thoughts on the overall concept.